While I was in Florida last month, I decided to send out some postcards to friends. One of them had a really simple recipe for Florida Key Lime Pie on it, which seemed interesting. So before sending it to a friend of mine who is in culinary school, I copied down the recipe. Luckily, I also found a digital copy of the postcard online to post here. =)
Here's what you need:
4 egg yolks
1-14 oz. can sweetened condensed milk
3 oz. Key Lime juice (equal to 6 tablespoons)
1 graham cracker pie crust
whipped cream
Yep, that's all you need! Don't believe me? Here's the postcard.
Assemble your ingredients and preheat the oven to 350ᵒF, please.
Simply combine the egg yolks and sweetened condensed milk in a bowl like so, and mix it up till it's all nice and combined...
Then start adding the Key Lime juice; I added 2 tablespoons at a time and mixed in between...
Once all 6 tablespoons (3 oz.) of the juice have been added, keep stirring until you have a nice, creamy consistency. Then pour it into your graham cracker crust...
And bake for 10 minutes at 350ᵒF...
Ta-dah! But hold on, you're not quite done yet. Let the pie cool for a bit on a wire rack, then place it in the fridge to let it chill completely before serving with whipped cream. =D
NOW, you can enjoy.
Your Cupcake,
~Jesia <3
Friday, August 10, 2012
Thursday, July 12, 2012
Cheesy Taco Bean Dip
So, this was my first time making bean dip, and it was super easy. It was also my first time eating it, and it was quite tasty, if I do say so myself. I used this recipe from the blog Life as a Lofthouse.
Here's what you need:
1 (8 oz.) package cream cheese
1 (8 oz.) package sour cream
1 tablespoon taco sauce (optional)
1 packet taco seasoning
1 large can (about 31 oz.) refried beans
1 (8 oz.) package (or 2 cups) shredded cheddar cheese*
1 (8 oz.) package (or 2 cups) shredded monterey jack cheese*
You'll also need some tortilla chips to serve this bean dip with!
*I actually used a 16 oz. package (4 cups) of "fiesta blend" shredded cheese, which contained both types of cheese called for in the recipe plus a couple of others.
Go ahead and preheat the oven to 350ᵒF and spray a 9"x13" glass casserole dish with cooking spray. You'll need a large mixing bowl and a utensil of choice (like a large spoon or a rubber spatula). First, mix together the cream cheese and sour cream (you'll probably want to soften the cream cheese; I was in a hurry and didn't do this, which resulted in small lumps of cream cheese throughout the mixture), then add the packet of taco seasoning and taco sauce and mix them in well. I personally went for a mild bean dip, using "cheesy" taco seasoning and mild sauce, but I'm sure you could spice it up with a hotter variety if you like. ;)
Next, add the can of refried beans and thoroughly incorporate it into the cream cheese mixture.
Then transfer the refried bean mixture to your casserole dish, making sure to spread it evenly.
Last, but certainly not least, top the bean mixture evenly with the shredded cheeses...
... and bake at 350ᵒF for 25-30 minutes, or until the cheese is nice and melted with a bit of a golden brown color to it. Voila! You have bean dip.
The layer of cheese is a bit thick, so you may need a spoon to break into the dip at first. You'll probably break your tortilla chip if you go straight in with it. =P Anyway, this recipe is easy, yummy, and perfect for get-togethers with friends or family. Enjoy!
Your Cupcake,
~Jesia <3
Here's what you need:
1 (8 oz.) package cream cheese
1 (8 oz.) package sour cream
1 tablespoon taco sauce (optional)
1 packet taco seasoning
1 large can (about 31 oz.) refried beans
1 (8 oz.) package (or 2 cups) shredded cheddar cheese*
1 (8 oz.) package (or 2 cups) shredded monterey jack cheese*
You'll also need some tortilla chips to serve this bean dip with!
*I actually used a 16 oz. package (4 cups) of "fiesta blend" shredded cheese, which contained both types of cheese called for in the recipe plus a couple of others.
Go ahead and preheat the oven to 350ᵒF and spray a 9"x13" glass casserole dish with cooking spray. You'll need a large mixing bowl and a utensil of choice (like a large spoon or a rubber spatula). First, mix together the cream cheese and sour cream (you'll probably want to soften the cream cheese; I was in a hurry and didn't do this, which resulted in small lumps of cream cheese throughout the mixture), then add the packet of taco seasoning and taco sauce and mix them in well. I personally went for a mild bean dip, using "cheesy" taco seasoning and mild sauce, but I'm sure you could spice it up with a hotter variety if you like. ;)
Next, add the can of refried beans and thoroughly incorporate it into the cream cheese mixture.
Then transfer the refried bean mixture to your casserole dish, making sure to spread it evenly.
Last, but certainly not least, top the bean mixture evenly with the shredded cheeses...
... and bake at 350ᵒF for 25-30 minutes, or until the cheese is nice and melted with a bit of a golden brown color to it. Voila! You have bean dip.
The layer of cheese is a bit thick, so you may need a spoon to break into the dip at first. You'll probably break your tortilla chip if you go straight in with it. =P Anyway, this recipe is easy, yummy, and perfect for get-togethers with friends or family. Enjoy!
Your Cupcake,
~Jesia <3
Monday, July 2, 2012
White Chip Brownies
My dad affectionately refers to these as "The World's Best Brownies," especially when served warm with vanilla ice cream and a bit of chocolate syrup. This recipe of homemade brownies is a brilliant creation from Nestlé® Toll House®. =)
Here's what you'll need:
1 cup all-purpose flour
1/2 cup baking cocoa powder
3/4 teaspoon baking powder
1/4 teaspoon salt
1 1/4 cup sugar
3/4 cup (1 1/2 sticks) butter, melted
2 teaspoons vanilla extract
3 eggs
1 (12 oz.) package white chocolate chips, divided
First off, preheat the oven to 350ᵒF and prepare a 9" square baking pan with foil (optional) and baking spray (not optional).
Then combine the flour, cocoa, baking powder, and salt together in a medium bowl. Set it aside for now.
In your mixing bowl combine the melted butter, sugar, and vanilla, and mix it up until it's nice and combined. Then add the eggs one at a time, mixing well after each addition. Next, gradually add all of the flour mixture and beat until well combined. (That's some yummy-looking batter, eh?) Lastly, add 1 1/2 cups of the white chocolate chips -- note that you don't add the entire bag! The remaining 1/2 cup will come into play later.
Pour the batter into your prepared pan and bake at 350ᵒF for 25-30 minutes. I always recommend checking a baked good after the minimum amount of time has passed. Today when I pulled out the pan after 25 minutes, the brownies were still gooey, as evidenced by the jiggling and using a toothpick to check for doneness, which came out with batter on it. I popped it back in the oven for five more minutes, and this time the toothpick only came out a little sticky, which, according to the recipe, means it's done! Hooray! Now it's time to let the brownies cool in the pan on a wire rack.
Once the brownies are cool, it's time to get out that other 1/2 cup of white chocolate chips. Now, I used to have no trouble with this part of the process, but the last time I made these brownies it just wouldn't come out right for some reason, and I ended up pretty much wasting a whooooole lotta white chocolate. =/ Anyway, the directions indicate that you add the remaining white chocolate chips to a heavy-duty (freezer-grade) zip-top bag and microwave it at 70% power for 30-45 seconds, then kneading the melting chocolate to mix. If it isn't completely smooth, you can continue microwaving at 70% power at 10-15 second intervals, kneading the chocolate in the bag each time until it's smooth. From what I understand, white chocolate is finicky when it comes to melting, and if it isn't done right it will harden (which is what happened to me last time). Anyway, assuming that it's done correctly, you then cut a tiny notch in a bottom corner of the bag and drizzle the white chocolate over the brownies however you desire. =)
Now, the directions indicate that you go ahead and drizzle the brownies while they're in the pan and uncut, and then refrigerate them for 5 minutes before cutting. I've run into problems with this method before, personally. After being refrigerated, the drizzle had hardened, and so when I cut the brownies the drizzle would pop off the brownies. =/ So I like to cut the brownies, remove them from the pan and place them on wax paper, and then drizzle each brownie individually. That way each brownie can keep its pretty white drizzle. =)
Now, if you want to go the extra mile, you can make a restaurant-style dessert out of these brownies. Warm up a brownie in the microwave for a few seconds and serve it with a scoop or two of vanilla ice cream and a drizzle of chocolate syrup over the ice cream. Not only is it absolutely scrumptious, but the arrangement is pretty too!
Mmmmm... Chocolaty, moist, and amazing with ice cream. (By the way, I apologize for the lack of pictures in this post. I honestly just didn't think about taking pictures during the process until it was already done. =P)
I definitely recommend this brownie, even if you're not a big fan of white chocolate (I'm not, and I think these are delicious). Enjoy it warm -- that's the best way!
Your Cupcake,
~Jesia <3
Here's what you'll need:
1 cup all-purpose flour
1/2 cup baking cocoa powder
3/4 teaspoon baking powder
1/4 teaspoon salt
1 1/4 cup sugar
3/4 cup (1 1/2 sticks) butter, melted
2 teaspoons vanilla extract
3 eggs
1 (12 oz.) package white chocolate chips, divided
First off, preheat the oven to 350ᵒF and prepare a 9" square baking pan with foil (optional) and baking spray (not optional).
Then combine the flour, cocoa, baking powder, and salt together in a medium bowl. Set it aside for now.
In your mixing bowl combine the melted butter, sugar, and vanilla, and mix it up until it's nice and combined. Then add the eggs one at a time, mixing well after each addition. Next, gradually add all of the flour mixture and beat until well combined. (That's some yummy-looking batter, eh?) Lastly, add 1 1/2 cups of the white chocolate chips -- note that you don't add the entire bag! The remaining 1/2 cup will come into play later.
Pour the batter into your prepared pan and bake at 350ᵒF for 25-30 minutes. I always recommend checking a baked good after the minimum amount of time has passed. Today when I pulled out the pan after 25 minutes, the brownies were still gooey, as evidenced by the jiggling and using a toothpick to check for doneness, which came out with batter on it. I popped it back in the oven for five more minutes, and this time the toothpick only came out a little sticky, which, according to the recipe, means it's done! Hooray! Now it's time to let the brownies cool in the pan on a wire rack.
Once the brownies are cool, it's time to get out that other 1/2 cup of white chocolate chips. Now, I used to have no trouble with this part of the process, but the last time I made these brownies it just wouldn't come out right for some reason, and I ended up pretty much wasting a whooooole lotta white chocolate. =/ Anyway, the directions indicate that you add the remaining white chocolate chips to a heavy-duty (freezer-grade) zip-top bag and microwave it at 70% power for 30-45 seconds, then kneading the melting chocolate to mix. If it isn't completely smooth, you can continue microwaving at 70% power at 10-15 second intervals, kneading the chocolate in the bag each time until it's smooth. From what I understand, white chocolate is finicky when it comes to melting, and if it isn't done right it will harden (which is what happened to me last time). Anyway, assuming that it's done correctly, you then cut a tiny notch in a bottom corner of the bag and drizzle the white chocolate over the brownies however you desire. =)
Now, the directions indicate that you go ahead and drizzle the brownies while they're in the pan and uncut, and then refrigerate them for 5 minutes before cutting. I've run into problems with this method before, personally. After being refrigerated, the drizzle had hardened, and so when I cut the brownies the drizzle would pop off the brownies. =/ So I like to cut the brownies, remove them from the pan and place them on wax paper, and then drizzle each brownie individually. That way each brownie can keep its pretty white drizzle. =)
Now, if you want to go the extra mile, you can make a restaurant-style dessert out of these brownies. Warm up a brownie in the microwave for a few seconds and serve it with a scoop or two of vanilla ice cream and a drizzle of chocolate syrup over the ice cream. Not only is it absolutely scrumptious, but the arrangement is pretty too!
Mmmmm... Chocolaty, moist, and amazing with ice cream. (By the way, I apologize for the lack of pictures in this post. I honestly just didn't think about taking pictures during the process until it was already done. =P)
I definitely recommend this brownie, even if you're not a big fan of white chocolate (I'm not, and I think these are delicious). Enjoy it warm -- that's the best way!
Your Cupcake,
~Jesia <3
Thursday, June 28, 2012
Coffee Toffee Fudge Brownies
Remember that Coffee Toffee Twisted Frosty™ at Wendy's®? I thought those were absolutely delicious. Unfortunately, they don't make them anymore. BUT, when Duncan Hines® was kind enough to send me free samples of their new Frosting Creations™ product, one of the flavors they gave me happened to be "mocha." You know where this is going, right?
My first thought was to make a "coffee toffee" version of yummy, fudgy brownies using the mocha frosting. And, oh boy, I was not disappointed. Seriously, I was amazed at how delicious these brownies were. Plus, they're so easy to make!
Here's what you'll need:
1 box Duncan Hines® Chewy Fudge Brownie mix (use the recipe for "fudgy" brownies)
2 eggs
1/4 cup water
1/2 cup vegetable oil
1 can Duncan Hines® Frosting Creations™ Frosting Starter
1 packet Duncan Hines® Frosting Creations™ Mocha Flavor Mix
1 (12 oz.) Classic Bag of miniature Heath® Milk Chocolate English Toffee Bars
First thing's first -- and I don't mean preheating the oven this time -- is a little prep work. Get out a nice, sharp knife and a cutting board, unwrap your mini Heath® bars, and get to chopping. I did a few at a time and put the candy pieces in a bowl as I went along. I personally cut one bar lengthwise once, then each half into three to four small chunks. You can make the candy bits as chunky or as fine as you like. You might be wondering if there's an easier way -- well, there is. You can actually buy an 8 oz. bag of Heath® bits, found in the baking aisle with the chocolate chips. I chose the 12 oz. bag of miniature bars because overall it was cheaper per ounce, and I don't mind a little extra work. (At the store I went to, the 12 oz. bag of bars was only about 10 cents more than the 8 oz. bag of candy bits. Dude, for 10 cents more you get 50% more product!)
Next, preheat the oven to 350°F, prepare your 13"x9" baking pan with foil and/or cooking spray, and get to work on the brownie batter. Combine the brownie mix, eggs, water, and oil in a mixing bowl and mix as per the directions on the box. I used my trusty KitchenAid® mixer, but apparently Duncan Hines® recommends hand-mixing brownies... Oh well, it turned out fine anyway! Once the batter is made, add about half of the Heath® bits and fold them in.
Pour the batter in the pan and bake as per box directions (27-30 minutes).
Now we play the waiting game... Once the brownies are done, you must must MUST be patient and let them cool completely. Otherwise, when you frost them, you'll end up with a gooey mess (yes, icing melts). When the brownies are completely cool, mix the flavor packet into the can of frosting starter as per directions and slather it on in a nice, thick, even layer over your brownies.
Last but not least, sprinkle the other half of the candy bits on top, and voila! You have Coffee Toffee Fudge Brownies.
Trust me, you'll want a nice, big hunk of this. I think these are now my absolute favorite brownies, and I want to make them again really soon. If you try this recipe (which you definitely should), I hope you enjoy it as much as I did!
Your Cupcake,
~Jesia <3
My first thought was to make a "coffee toffee" version of yummy, fudgy brownies using the mocha frosting. And, oh boy, I was not disappointed. Seriously, I was amazed at how delicious these brownies were. Plus, they're so easy to make!
Here's what you'll need:
1 box Duncan Hines® Chewy Fudge Brownie mix (use the recipe for "fudgy" brownies)
2 eggs
1/4 cup water
1/2 cup vegetable oil
1 can Duncan Hines® Frosting Creations™ Frosting Starter
1 packet Duncan Hines® Frosting Creations™ Mocha Flavor Mix
1 (12 oz.) Classic Bag of miniature Heath® Milk Chocolate English Toffee Bars
First thing's first -- and I don't mean preheating the oven this time -- is a little prep work. Get out a nice, sharp knife and a cutting board, unwrap your mini Heath® bars, and get to chopping. I did a few at a time and put the candy pieces in a bowl as I went along. I personally cut one bar lengthwise once, then each half into three to four small chunks. You can make the candy bits as chunky or as fine as you like. You might be wondering if there's an easier way -- well, there is. You can actually buy an 8 oz. bag of Heath® bits, found in the baking aisle with the chocolate chips. I chose the 12 oz. bag of miniature bars because overall it was cheaper per ounce, and I don't mind a little extra work. (At the store I went to, the 12 oz. bag of bars was only about 10 cents more than the 8 oz. bag of candy bits. Dude, for 10 cents more you get 50% more product!)
Next, preheat the oven to 350°F, prepare your 13"x9" baking pan with foil and/or cooking spray, and get to work on the brownie batter. Combine the brownie mix, eggs, water, and oil in a mixing bowl and mix as per the directions on the box. I used my trusty KitchenAid® mixer, but apparently Duncan Hines® recommends hand-mixing brownies... Oh well, it turned out fine anyway! Once the batter is made, add about half of the Heath® bits and fold them in.
Pour the batter in the pan and bake as per box directions (27-30 minutes).
Now we play the waiting game... Once the brownies are done, you must must MUST be patient and let them cool completely. Otherwise, when you frost them, you'll end up with a gooey mess (yes, icing melts). When the brownies are completely cool, mix the flavor packet into the can of frosting starter as per directions and slather it on in a nice, thick, even layer over your brownies.
Last but not least, sprinkle the other half of the candy bits on top, and voila! You have Coffee Toffee Fudge Brownies.
Trust me, you'll want a nice, big hunk of this. I think these are now my absolute favorite brownies, and I want to make them again really soon. If you try this recipe (which you definitely should), I hope you enjoy it as much as I did!
Your Cupcake,
~Jesia <3
Saturday, June 2, 2012
Dad's Favorite Pineapple Upside Down Cake
My dad's birthday is tomorrow, and every year I make his favorite cake: pineapple upside down cake (served with a dollop of whipped cream!). This time around I decided to change up my usual recipe just a little bit by adding a box of vanilla instant pudding mix and replacing the water in the recipe with pineapple juice.
Usually I would follow this recipe from Duncan Hines®, but I got the idea of adding pudding mix from this version of the recipe, which is baked in a cast-iron skillet. I mean, adding pudding mix to cake batter can only make it better, right? ;) I also noticed that several people who reviewed these recipes noted that they replaced the water with pineapple juice (which my boyfriend also does), even though the recipe specifically says not to (I wonder why?). I figured, why not give it a shot?
So, here's what you'll need:
1/2 cup (1 stick) butter
1 cup brown sugar
1 (20 oz.) can pineapple rings (with juice)
Maraschino cherries (at least 6)
1 (18.25 oz.) box Duncan Hines® Moist Deluxe® Pineapple Supreme Cake Mix
1 (3.4 oz.) box vanilla pudding mix
4 large eggs
1 cup pineapple juice*
1/2 cup oil
*There should be just about enough pineapple juice in the can of pineapple rings, but you can add a little water to make up the difference without a problem if you need to.
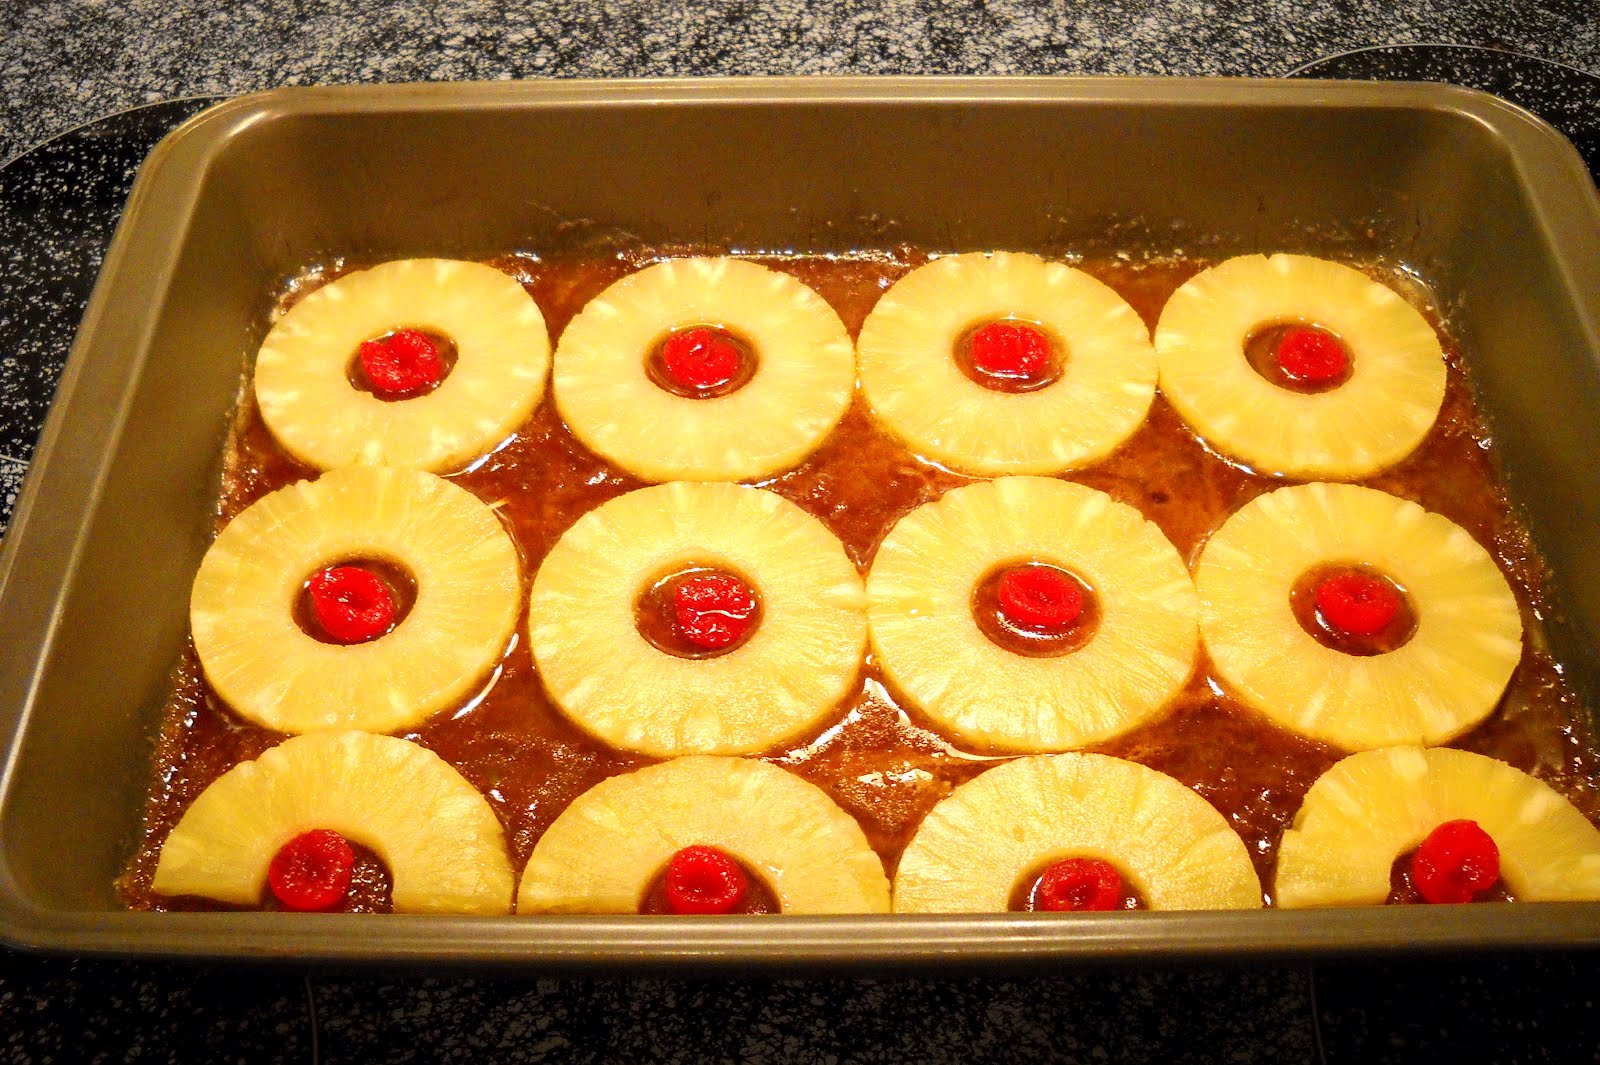
First off, preheat the oven to 350°F. Place the stick of butter in a 13x9" cake pan and put it in the oven until it's completely melted. Sprinkle the brown sugar over the melted butter in the bottom of the cake pan, using the back of a spoon to smooth and spread the butter and sugar mixture evenly if needed. Next, arrange the pineapple slices on top of the sugar mixture. Eight whole ones will fit nicely, and the other two can be cut in half. Cut the cherries in half and place one in the middle of each pineapple ring with the cut-side up.
Now that the topping is arranged, it's time to mix up the cake batter. Combine the cake mix, instant pudding mix, eggs, pineapple juice, and oil in a large mixing bowl, beating it on low for about 30 seconds; it will be lumpy. Scrape the sides of the bowl and the paddle with a rubber spatula, then beat for about 2 minutes at medium speed. The batter should be nicely combined and no longer lumpy.
Pour the cake batter evenly over the brown sugar and fruit topping.
Bake at 350°F. I put mine in for 50 minutes as the recipe said, but I think it was a little overdone. I would recommend checking it after 40-45 minutes.
Let the cake cool in the pan for about 15 minutes on a wire rack, then carefully turn the cake out onto a serving plate. I find that the easiest way to do that is to place the plate on top of the cake while it's still in the pan, and hold the plate and pan together securely while flipping them. After flipping so that the serving plate is on the table, carefully lift the cake pan slowly to let the cake slide out onto the plate. That's all there is to it!
Isn't it pretty?
Serve slices of the pineapple upside down cake with whipped cream, and enjoy! Happy birthday, Dad! I love you. =)
If there isn't enough fruit for your liking, I'm sure you could add pineapple chunks or more cherry halves in between the pineapple rings. I know that my boyfriend prefers his pineapple upside down cake made with the pineapple chunks instead of slices; it isn't as pretty, but it's easier to eat and also to cut the cake into smaller pieces.
Your Cupcake,
~Jesia <3
Usually I would follow this recipe from Duncan Hines®, but I got the idea of adding pudding mix from this version of the recipe, which is baked in a cast-iron skillet. I mean, adding pudding mix to cake batter can only make it better, right? ;) I also noticed that several people who reviewed these recipes noted that they replaced the water with pineapple juice (which my boyfriend also does), even though the recipe specifically says not to (I wonder why?). I figured, why not give it a shot?
So, here's what you'll need:
1/2 cup (1 stick) butter
1 cup brown sugar
1 (20 oz.) can pineapple rings (with juice)
Maraschino cherries (at least 6)
1 (18.25 oz.) box Duncan Hines® Moist Deluxe® Pineapple Supreme Cake Mix
1 (3.4 oz.) box vanilla pudding mix
4 large eggs
1 cup pineapple juice*
1/2 cup oil
*There should be just about enough pineapple juice in the can of pineapple rings, but you can add a little water to make up the difference without a problem if you need to.
First off, preheat the oven to 350°F. Place the stick of butter in a 13x9" cake pan and put it in the oven until it's completely melted. Sprinkle the brown sugar over the melted butter in the bottom of the cake pan, using the back of a spoon to smooth and spread the butter and sugar mixture evenly if needed. Next, arrange the pineapple slices on top of the sugar mixture. Eight whole ones will fit nicely, and the other two can be cut in half. Cut the cherries in half and place one in the middle of each pineapple ring with the cut-side up.
Now that the topping is arranged, it's time to mix up the cake batter. Combine the cake mix, instant pudding mix, eggs, pineapple juice, and oil in a large mixing bowl, beating it on low for about 30 seconds; it will be lumpy. Scrape the sides of the bowl and the paddle with a rubber spatula, then beat for about 2 minutes at medium speed. The batter should be nicely combined and no longer lumpy.
Pour the cake batter evenly over the brown sugar and fruit topping.
Bake at 350°F. I put mine in for 50 minutes as the recipe said, but I think it was a little overdone. I would recommend checking it after 40-45 minutes.
Let the cake cool in the pan for about 15 minutes on a wire rack, then carefully turn the cake out onto a serving plate. I find that the easiest way to do that is to place the plate on top of the cake while it's still in the pan, and hold the plate and pan together securely while flipping them. After flipping so that the serving plate is on the table, carefully lift the cake pan slowly to let the cake slide out onto the plate. That's all there is to it!
Serve slices of the pineapple upside down cake with whipped cream, and enjoy! Happy birthday, Dad! I love you. =)
If there isn't enough fruit for your liking, I'm sure you could add pineapple chunks or more cherry halves in between the pineapple rings. I know that my boyfriend prefers his pineapple upside down cake made with the pineapple chunks instead of slices; it isn't as pretty, but it's easier to eat and also to cut the cake into smaller pieces.
Your Cupcake,
~Jesia <3
Subscribe to:
Posts (Atom)