I've known my friend Ronni since high school; she and her family are amazing and hilarious. This meatloaf recipe comes from her. The beauty of this recipe lies in its simplicity and versatility. Seriously, you can add or substitute whatever you want. However, it's not just the simplicity that makes this recipe special -- it's the stories attached to it. Want to hear them?
One year I decided to throw a Halloween party at my house and asked that everyone who attended to please bring some kind of snack to share. Ronni decided she wanted to try her hand at making an opossum-shaped meatloaf, since, you know, it was Halloween and it would be creepy, right? So the story goes that Ronni spent all day in her kitchen preparing this amazing meatloaf. She specifically told everyone in the house to STAY AWAY from the meatloaf, that she was taking it to my party later that night. She left the kitchen for just a moment or two while the finished product was cooling on the counter, and when she returned, the head was missing. I guess her dad just couldn't resist that delicious opossum-shaped meatloaf! xP So she ended up not bringing it to the party, which was a shame, because I sure would've loved to see it.

I think Ronni should patent an opossum-shaped meatloaf pan. I'm sure it would sell well here in Kentucky and the rest of the South! xD I mean, come on, you could make opossum-shaped cakes, too!
The next story isn't quite so, I guess, gross-sounding. It's more fun and cute. In June of 2010, Ronni and Sara and I studied abroad in Japan, and we all stayed together with the same host family for a few days. On one of our last nights staying with them, Ronni decided to make her meatloaf to give them a taste of authentic American cooking. They loved it! The dad took a bite, seemed to think for a bit, and turned to Ronni and said, "What is in this?" She explained the simple ingredients that made up the meatloaf, and he said happily, "I'll make next time!" The two little boys loved it too; I think they each had a couple of slices. And I mean, these were little kids, ages 2 and 3! Anyway, it was a big hit and a really wonderful memory from our trip.
From left to right on the top: Sara, me, Grandpa, and Ronni.
From left to right on the bottom: Mom, Aunt holding Tomoya, Grandma, and Dad holding Kouya.
Okay, okay, that's enough story-telling... On to the recipe!
Here's what you'll need:
1 lb. ground beef (I use lean)
2 eggs
1 sleeve of saltine crackers (or whatever kind you prefer), crushed
Ketchup
Salt
Pepper
I like to add some other spices, myself, like onion flakes, garlic, and parsley. But the above is the basic meatloaf recipe, and you can adapt it however you like. One of my friends doesn't like ketchup, so I've been trying to think of a version to try making for him sometime.
First off, preheat the oven to 375ᵒF. You can add the ingredients to your large bowl in whatever order you like. This time I happened to crush the crackers within the plastic sleeve before pouring them in (it burst, though, so I used my hands and a fork to crush the rest).
Then I added my spices and mixed it up.
Then add the meat and eggs.
Making sure to wash your hands thoroughly first, use your hands (or a fork or other utensil if you want) to mix all the ingredients together very well. Add some ketchup and continue mixing until you feel like you have a good ratio of ingredients.
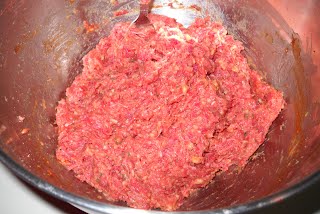
Then shape the meat into a loaf in a lightly greased casserole dish.
If you want, you can decorate the meatloaf with some more ketchup, or whatever sauce you like.
Bake at 375ᵒF for about an hour. Ta-dah! Meatloaf: an all-American classic.
I hear that meatloaf is a recipe that developed out of necessity. Adding breadcrumbs or crushed crackers and other ingredients stretches out the meat to make more servings. So it really is a good, solid recipe to fall back on for family dinners or other get-togethers. Plus it's simple to make and yummy. Tonight we served this meatloaf with a delicious baked macaroni and cheese dish that my boyfriend made. I'll have to make a post about that recipe sometime as well. ;)
Your Cupcake,
~Jesia <3
Tuesday, May 29, 2012
Friday, May 4, 2012
Confetti Cake Cookies
When I saw this recipe for Cake Batter Pudding Cookies, I could hardly wait to try it. Anyone who knows me probably knows how much I love confetti cake, and cookies are sort of my forte. Plus -- wait for it -- there's pudding in the mix! Cake + pudding + sprinkles = cookies? Yes, ma'am! That's everything that is good in the world mixed into one delightful recipe.
Here's what you need.
3/4 cup (1 1/2 sticks) butter (let it sit on the counter for a bit to soften up)
3/4 cup brown sugar
1/4 cup sugar
1 (3.4 oz.) package instant vanilla pudding mix
3/4 cup yellow cake mix*
2 eggs
1 teaspoon vanilla extract
2 1/4 cup flour
1 teaspoon baking soda
1/2 teaspoon salt
Rainbow sprinkles (I didn't measure, but I probably used around 1/4-1/3 cup)
*I personally found it interesting that this recipe uses 3/4 cup of yellow cake mix rather than, say, a certain-ounce box or other package. Since it's kind of difficult to use leftover cake mix for its intended purpose, I got the smallest (and least expensive) package I know of, which is Jiffy® brand. I remember using these mixes all the time as a kid when I moved up from the Easy-Bake® Oven to the big-girl oven. =)
So, let's begin! Preheat the oven to 350ᵒF and prepare a couple of cookie sheets with either baking spray or parchment paper. Cream together the butter, brown sugar, and sugar until combined.
Then add your package of instant vanilla pudding mix and 3/4 cup yellow cake mix. Combine well.
Add eggs and vanilla and continue to mix. Meanwhile, stir together the flour, baking soda, and salt in a separate bowl. Once the eggs and vanilla are thoroughly incorporated into the batter, start adding the flour mixture a few spoonfuls at a time until all of the flour is mixed in. The dough will be pretty thick.
Lastly, add in some rainbow sprinkles! You can just eyeball this and add as much as or as little as you want. I'd guess I used about 1/4-1/3 cup. Mix it thoroughly so that the sprinkles are evenly distributed throughout the dough.
Roll the dough into 1-inch balls with your hands and place about 2 inches apart on the cookie sheet.
Bake at 350ᵒF for 10-12 minutes. My cookies turned a bit golden-brown. Let them cool on the pan for a bit, then move to a rack so that they can cool completely.
Mmm, these cookies are buttery and yummy, not to mention pretty!
I was not disappointed by this recipe. =) It's different, yet familiar at the same time. I only wish that the cake mix ingredient wasn't in such an oddball measure, but oh well. I've found several other cake batter-flavored recipes I'd like to try anyway! ;)
Your Cupcake,
~Jesia <3
Here's what you need.
3/4 cup (1 1/2 sticks) butter (let it sit on the counter for a bit to soften up)
3/4 cup brown sugar
1/4 cup sugar
1 (3.4 oz.) package instant vanilla pudding mix
3/4 cup yellow cake mix*
2 eggs
1 teaspoon vanilla extract
2 1/4 cup flour
1 teaspoon baking soda
1/2 teaspoon salt
Rainbow sprinkles (I didn't measure, but I probably used around 1/4-1/3 cup)
*I personally found it interesting that this recipe uses 3/4 cup of yellow cake mix rather than, say, a certain-ounce box or other package. Since it's kind of difficult to use leftover cake mix for its intended purpose, I got the smallest (and least expensive) package I know of, which is Jiffy® brand. I remember using these mixes all the time as a kid when I moved up from the Easy-Bake® Oven to the big-girl oven. =)
So, let's begin! Preheat the oven to 350ᵒF and prepare a couple of cookie sheets with either baking spray or parchment paper. Cream together the butter, brown sugar, and sugar until combined.
Then add your package of instant vanilla pudding mix and 3/4 cup yellow cake mix. Combine well.
Add eggs and vanilla and continue to mix. Meanwhile, stir together the flour, baking soda, and salt in a separate bowl. Once the eggs and vanilla are thoroughly incorporated into the batter, start adding the flour mixture a few spoonfuls at a time until all of the flour is mixed in. The dough will be pretty thick.
Lastly, add in some rainbow sprinkles! You can just eyeball this and add as much as or as little as you want. I'd guess I used about 1/4-1/3 cup. Mix it thoroughly so that the sprinkles are evenly distributed throughout the dough.
Roll the dough into 1-inch balls with your hands and place about 2 inches apart on the cookie sheet.
Bake at 350ᵒF for 10-12 minutes. My cookies turned a bit golden-brown. Let them cool on the pan for a bit, then move to a rack so that they can cool completely.
Mmm, these cookies are buttery and yummy, not to mention pretty!
I was not disappointed by this recipe. =) It's different, yet familiar at the same time. I only wish that the cake mix ingredient wasn't in such an oddball measure, but oh well. I've found several other cake batter-flavored recipes I'd like to try anyway! ;)
Your Cupcake,
~Jesia <3
Saturday, April 28, 2012
Chicken Alfredo
Are you getting tired of pasta recipes yet? Yeah, like I said, I love pasta. So when I saw this recipe for an easy homemade Alfredo sauce, I had to give it a try. After all, some reviewers claimed that if you added garlic, it was just like Olive Garden®'s, which is delicious.
So here's what you need for the homemade Alfredo sauce:
1/2 cup (1 stick) butter
1 pint heavy whipping cream
1 1/2 cups grated Parmesan cheese
Garlic, to taste
Yeah, this is by no means a health food. Also, this recipe made quite a bit of sauce, possibly enough for a whole pound of pasta. After all, it is pretty rich and creamy. I'm sure you could cut the recipe in half, or just save any leftover sauce in the fridge.
First off, start melting the butter in a medium sauce pot on medium-low heat (a notch or two above low).
Once the butter is melted, add the heavy whipping cream and combine it well with a whisk. Stir often, and once the mixture starts to get nice and hot, start adding the Parmesan cheese 1/2 cup at a time. In between adding the 1/2 cups of cheese, whisk the mixture and let it have some time to melt and get creamy. Lastly, add some garlic (I used powder, but I'm sure fresh garlic would be much better). Once the sauce is creamy and mixed well, turn off the heat. It will thicken upon standing.
As for the chicken part of this meal, I kind of improvised. I'm not very practiced with preparing chicken. I bought about a pound of boneless chicken breast tenderloins, and my boyfriend, Paul, took care of taking off the skin and chewy, stringy bits and cutting it up into cubes.
You can cook the chicken however you want, of course. I kind of went off another chicken Alfredo recipe for this part. We put a little oil in a hot frying pan and cooked the raw chicken in batches, adding Italian seasoning. (I'm sure some other spices would be great too, like minced onion, garlic, parsley, salt, and pepper.) The chicken is done when it's no longer pink inside and out.
Once a batch of chicken is done, set it aside and cook some more, until all of it is done.
Serve the sauce and chicken over fettuccine or whatever pasta you like.
This was pretty tasty and got Paul's seal of approval. I do think that the chicken was a little bland, though, which is why I mentioned several other spices that would probably make it taste better. I'm sure it would also be good grilled or baked as well. I get the feeling that this is one of those recipes that you can improve on with practice and trial and error. =) If you give this a try, let me know how it turns out!
Your Cupcake,
~Jesia <3
So here's what you need for the homemade Alfredo sauce:
1/2 cup (1 stick) butter
1 pint heavy whipping cream
1 1/2 cups grated Parmesan cheese
Garlic, to taste
Yeah, this is by no means a health food. Also, this recipe made quite a bit of sauce, possibly enough for a whole pound of pasta. After all, it is pretty rich and creamy. I'm sure you could cut the recipe in half, or just save any leftover sauce in the fridge.
First off, start melting the butter in a medium sauce pot on medium-low heat (a notch or two above low).
Once the butter is melted, add the heavy whipping cream and combine it well with a whisk. Stir often, and once the mixture starts to get nice and hot, start adding the Parmesan cheese 1/2 cup at a time. In between adding the 1/2 cups of cheese, whisk the mixture and let it have some time to melt and get creamy. Lastly, add some garlic (I used powder, but I'm sure fresh garlic would be much better). Once the sauce is creamy and mixed well, turn off the heat. It will thicken upon standing.
As for the chicken part of this meal, I kind of improvised. I'm not very practiced with preparing chicken. I bought about a pound of boneless chicken breast tenderloins, and my boyfriend, Paul, took care of taking off the skin and chewy, stringy bits and cutting it up into cubes.
You can cook the chicken however you want, of course. I kind of went off another chicken Alfredo recipe for this part. We put a little oil in a hot frying pan and cooked the raw chicken in batches, adding Italian seasoning. (I'm sure some other spices would be great too, like minced onion, garlic, parsley, salt, and pepper.) The chicken is done when it's no longer pink inside and out.
Once a batch of chicken is done, set it aside and cook some more, until all of it is done.
Serve the sauce and chicken over fettuccine or whatever pasta you like.
This was pretty tasty and got Paul's seal of approval. I do think that the chicken was a little bland, though, which is why I mentioned several other spices that would probably make it taste better. I'm sure it would also be good grilled or baked as well. I get the feeling that this is one of those recipes that you can improve on with practice and trial and error. =) If you give this a try, let me know how it turns out!
Your Cupcake,
~Jesia <3
Saturday, April 21, 2012
Gooey Rolo® Blondies
I love Rolo® candies. I mean, they're small, sweet, chewy, and come in cute little gold foil wrappers... What more could you ask for? Oh, right, a dessert MADE with Rolo®! I found this simple recipe a little while back and saved it.
I was reluctant to change anything about it, but I couldn't help but wonder if the caramel in the candies would be enough. So I decided to experiment by drizzling some caramel on top of the confection once it was finished.
Here's what you need:
1 (18.25 oz.) box yellow or white cake mix
1/4 cup (1/2 stick) butter, melted
5 oz. evaporated milk
45 Rolo® candies, unwrapped and cut in half
Caramel dessert topping
First thing's first: a bit of prep work. Unwrap each of the 45 Rolo® candies and carefully cut them in half. Since it was a bit warm in my apartment, after I was done with this step, I placed the bowl of candies in the fridge. By the way, the bag of Rolo® I got had 55 candies in it, so you COULD use all of them. But hey, I don't mind having a few extra around. ;)
Next preheat the oven to 350ᵒF and grease a 13"x9" baking pan with cooking/baking spray. (Using foil to line the pan is my personal preference. It can make it a lot easier to get the confection out of the pan when it's done in that you can carefully lift the entire thing out by the foil and then cut into bars outside the pan.)
Combine the cake mix, melted butter, and evaporated milk in your mixing bowl.
Mix it up on low speed until the batter is nicely combined, stopping to scrape the bowl and paddle as needed.
Cut the dough in half using a rubber spatula.
Spread half of the dough in the bottom of your prepared 13"x9" pan. It's super sticky and difficult to spread, so I ended up spraying my rubber spatula with cooking spray and used it to spread the batter, going back to cover up holes in the layer as needed.
Bake for about 6-8 minutes, just until the bottom layer is set. Then remove the pan from the oven and place the Rolo® candies caramel-side down all over the hot baked layer.
Then (this part was a little tricky for me) place little dollops or small spoonfuls of the remaining dough all over the candies. Don't worry about spreading this layer like the bottom one. Just cover as best as you can.
Then bake for about 18-20 more minutes. It will be golden brown.
And, if desired, drizzle some caramel dessert topping over the entire thing. Mmm!
Now that's some sweet stuff. ;)
I followed the baking directions from the original recipe when I made this batch (8 minutes, then 20 minutes), but I think it may have been just a little overdone. After all, when the bars sit in the hot pan after you take it out of the oven, it continues baking for a little bit. So, the time ranges that I gave above are slightly altered. If you give this recipe a try, let me know how it turns out! =)
Your Cupcake,
~Jesia <3
I was reluctant to change anything about it, but I couldn't help but wonder if the caramel in the candies would be enough. So I decided to experiment by drizzling some caramel on top of the confection once it was finished.
Here's what you need:
1 (18.25 oz.) box yellow or white cake mix
1/4 cup (1/2 stick) butter, melted
5 oz. evaporated milk
45 Rolo® candies, unwrapped and cut in half
Caramel dessert topping
First thing's first: a bit of prep work. Unwrap each of the 45 Rolo® candies and carefully cut them in half. Since it was a bit warm in my apartment, after I was done with this step, I placed the bowl of candies in the fridge. By the way, the bag of Rolo® I got had 55 candies in it, so you COULD use all of them. But hey, I don't mind having a few extra around. ;)
Next preheat the oven to 350ᵒF and grease a 13"x9" baking pan with cooking/baking spray. (Using foil to line the pan is my personal preference. It can make it a lot easier to get the confection out of the pan when it's done in that you can carefully lift the entire thing out by the foil and then cut into bars outside the pan.)
Combine the cake mix, melted butter, and evaporated milk in your mixing bowl.
Mix it up on low speed until the batter is nicely combined, stopping to scrape the bowl and paddle as needed.
Cut the dough in half using a rubber spatula.
Spread half of the dough in the bottom of your prepared 13"x9" pan. It's super sticky and difficult to spread, so I ended up spraying my rubber spatula with cooking spray and used it to spread the batter, going back to cover up holes in the layer as needed.
Bake for about 6-8 minutes, just until the bottom layer is set. Then remove the pan from the oven and place the Rolo® candies caramel-side down all over the hot baked layer.
Then (this part was a little tricky for me) place little dollops or small spoonfuls of the remaining dough all over the candies. Don't worry about spreading this layer like the bottom one. Just cover as best as you can.
Then bake for about 18-20 more minutes. It will be golden brown.
And, if desired, drizzle some caramel dessert topping over the entire thing. Mmm!
Now that's some sweet stuff. ;)
I followed the baking directions from the original recipe when I made this batch (8 minutes, then 20 minutes), but I think it may have been just a little overdone. After all, when the bars sit in the hot pan after you take it out of the oven, it continues baking for a little bit. So, the time ranges that I gave above are slightly altered. If you give this recipe a try, let me know how it turns out! =)
Your Cupcake,
~Jesia <3
Thursday, April 19, 2012
Italian-Style Meatballs
This was my first time making homemade meatballs, and I wasn't disappointed. The recipe I found is interesting in that the meatballs are slow-cooked in tomato sauce for 3 hours instead of baked. While this does make them delicious, it also requires, well, time, which a lot of people seem to be short on these days. No matter! This recipe is worth it.
Here's what you'll need:
1 lb. ground beef*
1 egg
1/4 cup milk
1/4 cup grated Parmesan cheese
1/2 cup bread crumbs**
Salt
Pepper
Garlic (I'd recommend omitting the plain salt if you use garlic salt)
Parsley flakes
Minced onion
1 jar (about 24 oz.) of your favorite spaghetti sauce
*I used lean ground beef since there isn't a way to drain off the excess fat in this recipe; the meatballs cook right in the sauce. I also read that for an even more "authentic" Italian flavor, you can use equal parts of ground beef, veal, and pork.
**I happened to have Italian-style bread crumbs on hand, which were already seasoned, so I went lighter on the extra spices; you'll probably want to use more if you use plain bread crumbs, perhaps even adding Italian seasoning. Of course, you can add whatever spices you like.
In a large bowl, combine the meat, egg, milk, Parmesan cheese, bread crumbs, and spices. (I didn't bother measuring the spices; I simply eyeballed it and added however much I thought was appropriate.)
Make sure to wash your hands thoroughly before and after handling raw meat! In particular you'll want to pay attention to your fingernails, as meat and other things can get caught under them.
Use your hands to incorporate all the ingredients together. (I know, it's cold, isn't it?)
"Braaaaaaaaaaainsssss..."
Go ahead and pour your jar of spaghetti sauce into a large saucepan or slow-cooker so that it can start warming up. Use the "low" setting on a slow-cooker or a notch or two above low for the stove top.
Now it's time to shape the meatballs. Simply pinch off some of the meat mixture and roll it into a ball in your hands (like you would with Play-Doh). You could also use a small ice cream or cookie scoop if you want more even portions, but I didn't have one on hand; just make sure that you still roll the meatball in your hands so as to be sure that they're nice and solid. How many meatballs you get out of the mixture depends on how large or small you make them. I made mine about the size of ping-pong or golf balls, which yielded 27.
Now it's time to add the raw meatballs to your pot of sauce! You can use a pot on the stove top or a slow-cooker. I borrowed a friend's Crock-Pot® for the task.
Gently stir the meatballs so that they all get a coating of sauce. Cover the pot and simmer for 3 hours. (Yes, 3 hours.) I checked on it every now and then and gave the meatballs a gentle stir.
Looks good, eh? And trust me, it smells good too. Mmm... You can serve these bad boys over some pasta with a side of garlic bread like I did, or you could put them on some nice thick bread to make a meatball sub.
Yum yum! Not a single meatball was left last night. =) I think it's safe to say that it was a success. I would definitely make this again.
Your Cupcake,
~Jesia <3
Here's what you'll need:
1 lb. ground beef*
1 egg
1/4 cup milk
1/4 cup grated Parmesan cheese
1/2 cup bread crumbs**
Salt
Pepper
Garlic (I'd recommend omitting the plain salt if you use garlic salt)
Parsley flakes
Minced onion
1 jar (about 24 oz.) of your favorite spaghetti sauce
*I used lean ground beef since there isn't a way to drain off the excess fat in this recipe; the meatballs cook right in the sauce. I also read that for an even more "authentic" Italian flavor, you can use equal parts of ground beef, veal, and pork.
**I happened to have Italian-style bread crumbs on hand, which were already seasoned, so I went lighter on the extra spices; you'll probably want to use more if you use plain bread crumbs, perhaps even adding Italian seasoning. Of course, you can add whatever spices you like.
In a large bowl, combine the meat, egg, milk, Parmesan cheese, bread crumbs, and spices. (I didn't bother measuring the spices; I simply eyeballed it and added however much I thought was appropriate.)
Make sure to wash your hands thoroughly before and after handling raw meat! In particular you'll want to pay attention to your fingernails, as meat and other things can get caught under them.
Use your hands to incorporate all the ingredients together. (I know, it's cold, isn't it?)
Go ahead and pour your jar of spaghetti sauce into a large saucepan or slow-cooker so that it can start warming up. Use the "low" setting on a slow-cooker or a notch or two above low for the stove top.
Now it's time to shape the meatballs. Simply pinch off some of the meat mixture and roll it into a ball in your hands (like you would with Play-Doh). You could also use a small ice cream or cookie scoop if you want more even portions, but I didn't have one on hand; just make sure that you still roll the meatball in your hands so as to be sure that they're nice and solid. How many meatballs you get out of the mixture depends on how large or small you make them. I made mine about the size of ping-pong or golf balls, which yielded 27.
Now it's time to add the raw meatballs to your pot of sauce! You can use a pot on the stove top or a slow-cooker. I borrowed a friend's Crock-Pot® for the task.
Gently stir the meatballs so that they all get a coating of sauce. Cover the pot and simmer for 3 hours. (Yes, 3 hours.) I checked on it every now and then and gave the meatballs a gentle stir.
Looks good, eh? And trust me, it smells good too. Mmm... You can serve these bad boys over some pasta with a side of garlic bread like I did, or you could put them on some nice thick bread to make a meatball sub.
Yum yum! Not a single meatball was left last night. =) I think it's safe to say that it was a success. I would definitely make this again.
Your Cupcake,
~Jesia <3
Subscribe to:
Posts (Atom)

